Flappy Bird in Excel VBA - Using Class Modules
Useful Links
Return to the Flappy Bird in Excel VBA Tutorial index.
Download Flappy Owl Pt8a - Timer Class.
Download Flappy Owl Pt8b - Bird Class.
Introduction
Apart from a couple of event procedures for the button clicks, we've written
every line of code in this project in normal modules. In this part of the
tutorial we're going to reorganise things by converting some of the existing
code into a set of class modules.
Writing a well-designed class module is a great way to encapsulate a set of
related procedures in a single unit - after all, classes are what
object-oriented programming is all about. The classes we'll create in this part
of the tutorial will be quite simple, but it will set us up nicely for creating
more complex classes later in the project.
Creating class modules won't make the slightest bit of difference to the
player. It will, however, make a big difference to the way we write and
structure our code from now on. Fortunately, we've already done a pretty good
job at keeping our code organised so far - this will make it easy to incorporate
class modules.
Creating a Timer Class
We're going to start with one of the more common uses of class modules in
VBA: encapsulating some Windows API functions to make them easier to use. Start
by inserting a class module into the project. You do this in much the same way
you insert a normal module:
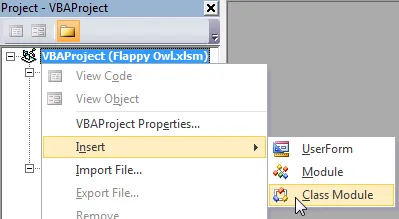
Right-click anywhere in the project and choose to insert a class module.
Once the module has been created, change its name in the usual way.
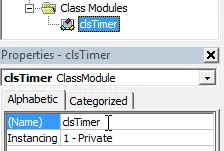
Use the
Properties window to rename the class module. I've called mine
clsTimer.
Now we can start moving code from our normal modules into the class module.
We'll start with the Windows API function declarations. It isn't necessary to
move these declarations, they'll still work happily if we leave them in the
normal module, but it makes sense from an organisational point of view to have
all of the code concerning our timer in one place.
Cut the declarations for the SetTimer and KillTimer
functions from the modPublicDeclarations module and paste them
at the top of the clsTimer module, just below Option
Explicit. Once you've done this you can also change the word
Public to Private for each of the functions. The end
result should look like this:
Option Explicit
#If Win64 Then
Private Declare PtrSafe Function SetTimer Lib "user32" ( _
ByVal hwnd As LongPtr, _
ByVal nIDEvent As LongPtr, _
ByVal uElapse As Long, _
ByVal lpTimerFunc As LongPtr) As LongPtr
Private Declare PtrSafe Function KillTimer Lib "user32" ( _
ByVal hwnd As LongPtr, _
ByVal nIDEvent As LongPtr) As Long
#Else
Private Declare Function SetTimer Lib "user32" ( _
ByVal hwnd As Long, _
ByVal nIDEvent As Long, _
ByVal uElapse As Long, _
ByVal lpTimerFunc As Long) As Long
Private Declare Function KillTimer Lib "user32" ( _
ByVal hwnd As Long, _
ByVal nIDEvent As Long) As Long
#End If
We can change these declarations to Private because they'll
only ever be referenced within the class module. We also need to declare a
couple of variables to hold the timer ID and the timer interval. Add these lines
just after your function declarations:
Private pGameTimerID As Long
Private pGameTimerInterval As Double
Using the letter 'p' at the start of the variable names is a common way to
indicate that the variables are private to the class and to distinguish them
from their associated properties.
The Initialise Event of a Class
When we start using our timer class, the first thing we want to do is set its
interval. Previously we did this by writing our own InitialiseTimer
procedure. One of the useful features of class modules is that they have their
own built-in initialise event. You can generate the code for this event using
the drop down lists at the top of the class module's code window:

Click the drop down list at the top left of the code window and select
Class.
This will automatically
generate the procedure for the initialise event of the class. It should look
like this:

This event is triggered automatically whenever we create a new instance of our timer class.
This type of procedure, i.e. one which is executed automatically when an
instance of a class is created, is referred to as a constructor. In other
languages you can write your own constructors for a class, define parameters for
the constructor and even create multiple versions of the constructor with
different parameter lists (a technique known as overloading). In VBA you can't
do any of these fancy things: you can only use the Class_Initialize
procedure. A neat workaround for this limitation is shown
here.
All we need to do now is add code to the initialise procedure to set the
timer interval. Add a line of code so that the entire procedure looks like this:
Private Sub Class_Initialize()
pGameTimerInterval = 50
End Sub
Creating a Method in a Class Module
We could also add the code to start the timer to the initialise procedure
but, for reasons that will become clear later, we're going to create a separate
procedure for this. Add the following subroutine to the class module:
Public Sub StartTimer()
pGameTimerID = _
SetTimer(0, 0, pGameTimerInterval, AddressOf UpdateAndDrawGame)
End Sub
A subroutine stored in a class module is technically referred to as a method.
It's important that this is a public procedure as we'll need to use our StartTimer method in the main game code later.
The Terminate Event of a Class
Now we have a way to start the timer we also need a way to stop it. We could
do this by creating another method but for this example we'll use another event
of the class module called Terminate. From the drop down lists
at the top of the code page, make sure you've selected Class
from the left hand side, then choose Terminate from the right
hand side.

Select
the Terminate event from the list on the right.
This generates the event procedure which is triggered whenever an instance of
our timer class is destroyed. This type of procedure is known as a destructor
and we're going to use ours to stop the game timer. Add code to the procedure so
that it looks like this:
Private Sub Class_Terminate()
If pGameTimerID <> 0 Then
KillTimer 0, pGameTimerID
pGameTimerID = 0
End If
End Sub
Creating Properties in a Class Module
The final thing that we're going to add to our timer class is a property
which will allow other modules to see and change the timer interval value. It's
unlikely that we'll need to change the speed that the game updates but this is a
nice way to demonstrate how to write simple property procedures.
Because we want to be able to both change the interval and check what its
value is we need to write two separate property procedures. We'll start with the
one which lets us change the value. Add the following code to the bottom of the
class module:
Public Property Let TimerInterval(Value As Double)
pGameTimerInterval = Value
End Property
When we use this property later, whatever value we pass in via the
Value parameter will be stored in the pGameTimerInterval
variable in the instance of the class.
Now we need to create a procedure that will retrieve the value of the timer
interval. Add this code to the bottom of the class module:
Public Property Get TimerInterval() As Double
TimerInterval = pGameTimerInterval
End Property
You don't always need to create both property procedures. For example, if you
wanted to create a read-only property you could just create the Public
Property Get procedure.
Using a Class Module in Other Code
That's it for our simple timer class, now we need to make use of it in our
main game code. Head back to the modGameCode module and declare
the following variable at the top, just below Option Explicit:
Private GameTimer As clsTimer
Now we need to create a new instance of the timer class in the
InitialiseGame subroutine. Remove the line which says
InitialiseTimer and replace it with the line shown below:
Set GameTimer = New clsTimer
This line will automatically trigger the initialise event of the timer class,
setting the timer interval to our default value of 50. If we want to do anything
with our timer now we simply need to reference our variable and use its methods
and properties. For instance, if we wanted to modify the timer interval we could
use the property we created earlier:
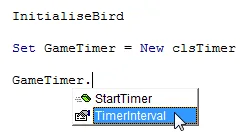
The
GameTimer variable behaves like a reference to any other object in VBA. Type in a full stop after its name to see
a list of its methods and propeties.
We don't want to change the timer interval at this point, all we want to do is
start the timer. Add a line of code to do this so that the complete subroutine
looks like this:
Public Sub InitialiseGame()
SetGameKeys
shTest.Select
Range("A1").Select
Cells.Clear
InitialiseBird
Set GameTimer = New clsTimer
GameTimer.StartTimer
End Sub
We also need to add code to stop the timer. Go to the TerminateGame
subroutine and replace the line which says TerminateTimer with
this one:
This line will automatically trigger the terminate event of the timer class,
stopping the timer. The complete subroutine should look like this:
Public Sub TerminateGame()
Set GameTimer = Nothing
shMenu.Activate
ResetKeys
End Sub
Setting the variable to Nothing will also release the
reference to the object and free up any resources that it was using. Note that
in VBA this will happen automatically when the variable goes out of scope; VBA
is garbage-collected meaning that it periodically tidies up after itself. In
this example we declared the GameTimer variable at the module
level meaning that it will remain in scope even when the subroutine ends. This
is why we explicitly
set the variable to Nothing within the subroutine.
We can now remove the original timer module as we don't need it any longer.
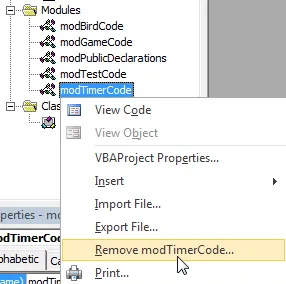
Right-click on the module and choose to remove it. Click
No on the dialog box which appears as we don't want to export the module before it's deleted.
It's worth quickly testing the game to make sure that it behaves in the same way
it did before we added the class module. Head back into Excel and make sure that
when you click the Start and Stop buttons the game behaves normally. If not,
check the code carefully or just download the working example from the top of
the page.
A Quick Note on Auto-Instancing Variables
It's possible to declare the variable for our timer class so that we don't
have to decide when to create a new instance. To do this we'd declare the
variable like so:
Private GameTimer As New clsTimer
This variable would automatically create a new instance of the timer class
when it was required, meaning that we could remove the following line of code
completely:
Auto-instancing variables sound like convenient time-savers but there are a
couple of small drawbacks which need to be considered. Firstly, there's an
(admittedly very small) overhead associated with testing whether an instance of
the timer needs to be created (although there is
some debate about whether this is really that important). Secondly, we lose
the ability to test whether the variable has been set or not. The following
logical test will never return True:
If GameTimer Is Nothing Then
End If
As soon as we invoke the GameTimer variable it will
automatically be set to an instance of the timer class and so it can never be
Nothing.
Again, it's unlikely to make a difference for our particular project but I
think we'll all feel better if we retain control over when our object instances
are created and destroyed.
Creating the Bird Class
The next job is to convert the module containing all of the bird code into a
class module. Start by inserting and renaming another class module:
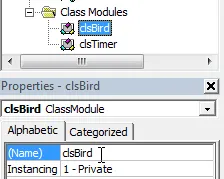
Insert and rename the module as normal.
We now need to begin the wholesale transfer of code from the original bird
module into the new class module. Start by copying all of the variables declared
at the top of modBirdCode and pasting them at the top of the
class module. For reference, this is what you should see at the top of the class
module:
Option Explicit
Private BirdImage As Range
Private BirdHeight As Integer
Private BirdWidth As Integer
Private BirdCell As Range
Private BirdPreviousRectangle As Range
Private BirdVerticalMovement As Long
Private Const Gravity As Byte = 1
Private Const FlapHeight As Integer = -8
Private Const DiveDepth As Integer = 8
Private FloorRange As Range
Private PreviousUpKeyState As Integer
Private PreviousDownKeyState As Integer
Now create the constructor for the class by choosing the relevant option from
the drop down list at the top of the code window:
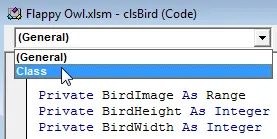
Choose
Class from the drop down list to generate the constructor.
Now return to the modBirdCode module and copy all of the code
from within the InitialiseBird subroutine. Return to the class
module and paste all of the code into the constructor. The end result should
look like this:
Private Sub Class_Initialize()
Set BirdImage = shSprites.Range("OwlImage")
BirdHeight = BirdImage.Rows.Count
BirdWidth = BirdImage.Columns.Count
Set BirdCell = shTest.Range("R5")
BirdImage.Copy BirdCell
BirdVerticalMovement = 0
Set FloorRange = shTest.Range("A40:Z40")
FloorRange.Interior.Color = rgbBlack
PreviousUpKeyState = GetAsyncKeyState(vbKeyUp)
PreviousDownKeyState = GetAsyncKeyState(vbKeyDown)
End Sub
The next step is to copy the five remaining subroutines from the
modBirdCode module and paste them into the class module. For reference
these subroutines are called UpdateBird, DrawBird,
Flap, Dive and CheckKeys.
Once you've pasted them, change the name of the UpdateBird and
DrawBird subroutines to Update and
Draw respectively.
We don't need to create any properties for the bird class yet so head back to
the modGameCode module and add a variable declaration to the
top of the module:
Now, in the InitialiseGame subroutine, change the line which
says InitialiseBird with the following code:
Next, in the UpdateAndDrawGame subroutine, change the two
lines which say UpdateBird and DrawBird with
calls to the relevant methods from the bird class. We'll also update what
happens if the user presses the TAB key to exit
the game. The final subroutine should
look like this:
Public Sub UpdateAndDrawGame()
If GetAsyncKeyState(vbKeyTab) <> 0 Then
TerminateGame
Exit Sub
End If
Bird.Update
Bird.Draw
End Sub
We could also add code which disposes of the instance of the bird class when
the game ends. In the TerminateGame subroutine add a line which
does this after the line which ends the timer. The final result should look like
this:
Public Sub TerminateGame()
Set GameTimer = Nothing
Set Bird = Nothing
shMenu.Activate
ResetKeys
End Sub
We didn't create a destructor for the bird class, so doing this won't trigger
any code to run. As described earlier on this page, the additional line will
simply release the reference to the object and free up any resources that it was
using.
As we're including the line to dispose of our bird object it's important that
the UpdateAndDrawGame method doesn't attempt to refer to the
Bird object variable after it's been destroyed. This is why we
added the Exit Sub line to the If
statement.
We can now delete the original modBirdCode module as it's no
longer needed:
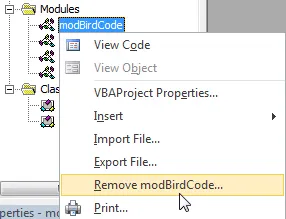
Right-click on the module and choose to remove it. Click
No on the dialog box which appears.
All that we need to do now is test the game to ensure that it still behaves as
expected. If it doesn't then check your code carefully or just download the
working example from the top of this page.
What's Next?
At this stage it probably feels like we've made a lot of effort for not much
reward but, as the rest of the game is going to be built on classes, it was
important to do this now. In the next part of the tutorial we're going to
continue this theme by creating a game class and upgrade our simple test
worksheet at the same time.


