The previous part of this tutorial section showed how to create tables using SQL - this one shows how to populate them with data.
When I was first learning SQL, these were some of the commands that I found the hardest to remember. The problem is that there are 3 ways to do this, and each does a different thing. The 3 ways are:
Method | What it does |
|---|
INSERT INTO ... VALUES | Inserts a single record into a table. |
INSERT INTO ... SELECT | Adds a set of rows into a table. |
SELECT ... INTO | Creates a new tables from a set of rows. |
The last two methods use similar syntax, and are particularly easy to confuse.
Aficionados (aficionadi?) of Access should note that the above methods correspond to append and make-table queries.
This blog will consider each of the 3 methods shown above in turn!
If you want to add one row into a table, the syntax is:
INSERT INTO TableName ( column 1, ... column n) VALUES (1, ... n)
As with everything this is best shown by example!
Adding a Single Row into a Table
Suppose that we've created a table of authors:
CREATE TABLE tblAuthor (
AuthorId int IDENTITY(1,1) PRIMARY KEY,
FirstName varchar(100),
LastName varchar(100) NOT NULL,
DateAdded datetime DEFAULT GetDate()
)
For the above table:
the value for the AuthorId field will be set automatically
The LastName field can not be null, so we must set this
The other two fields can be null (if left null, the DateAdded field will take a default value)
All of the following will add a new author into the table. First, the minimalist approach:
INSERT INTO tblAuthor (
LastName
) VALUES (
'Smith'
)
Next, the opposite extreme, giving every field a value:
INSERT INTO tblAuthor (
FirstName,
LastName,
DateAdded
) VALUES (
'John',
'Wyndham',
'01/01/2010'
)
A halfway house is as follows (this also shows that you don't need to specifiy the fields in any particular order):
INSERT INTO tblAuthor (
DateAdded,
LastName
) VALUES (
'05/01/2011',
'Jones'
)
The result of running the 3 commands above would be the following table:

The FirstName column has not been specified for the first and third row.
Setting Identity Field (AutoNumber Field) Values
In all of the above examples, the AuthorId was set automatically. However, you can tell SQL that you will set a value for Identity columns:
SET IDENTITY_INSERT tblAuthor ON
INSERT INTO tblAuthor (
AuthorId,
FirstName,
LastName
) VALUES (
6,
'Jane',
'Austen'
)
SET IDENTITY_INSERT tblAuthor OFF
INSERT INTO tblAuthor (
LastName
) VALUES (
'Robinson'
)
select * from tblauthor
The above lines will suspend automatic autonumbering of the AuthorId field for one line (while Jane Austen is inserted as AuthorId 6), then resume automatic numbering again to get:
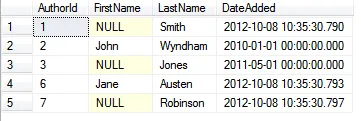
Jane Austen is number 6; Robinson is automatically given the next number, 7.
SQL will never allow duplicate values for a primary key, so it's easy to generate errors if you try to take control of an Identity field.
Picking Up on the Identity Field Value Created
When you're writing an application, it is vital to be able to find out the record number of the row just inserted. You can do this using the following:
What to use | What it does |
|---|
@@Identity | Gives the last id field value created using your connection (even if this was created indirectly by a trigger or function). |
SCOPE_IDENTITY() | Returns the last id field value explicitly created by your connection (this is likely to be the most useful value). |
IDENT_CURRENT('tablename') | Returns the last id field value created for a specific named table by any connection. |
To put this into English: use SCOPE_IDENTITY() to give you the last identity field value created by you, or IDENT_CURRENT('tblAuthor') (for example) to give the last identity field value created for the table tblAuthor.
Here's an example of the use of SCOPE_IDENTITY():
DECLARE @id int
INSERT INTO tblAuthor (
FirstName,
LastName
) VALUES (
'Charles',
'Dickens'
)
SET @id = SCOPE_IDENTITY()
PRINT 'Just added row ' + CAST(@id as varchar(10))
This is what the above SQL will show when you run it:

We see the number of the row just added.
And that completes this discussion about how to insert single rows; what we'll now do is look at adding multiple rows into a table in one go.
Instead of inserting rows one at a time, you can take the set of rows returned by a SELECT statement and add these at the bottom of an existing table, using:
INSERT INTO TableName (col1, ..., coln)
SELECT field1, ... fieldn FROM ...
The only rule is that the fields you're inserting must be of the same data type as the fields you're inserting into.
Inserting Multiple Rows - the Vanilla Version
To show how this works, let's set up two similar tables to hold names of authors (notice that the number, order and names of the columns aren't identical). First a table to hold the source authors:
CREATE TABLE tblAuthor (
AuthorId int IDENTITY(1,1) PRIMARY KEY,
Rating int,
FirstName varchar(100),
LastName varchar(100) NOT NULL,
)
Now we'll add in 3 authors:
INSERT INTO tblAuthor (Rating, FirstName, LastName)
VALUES (10, 'John', 'Wyndham')
INSERT INTO tblAuthor (Rating, FirstName, LastName)
VALUES (8, 'Vikram', 'Seth')
INSERT INTO tblAuthor (Rating, FirstName, LastName)
VALUES (3, 'Cathy', 'Cassidy')
The table we'll insert rows into will have Surname, FirstName and Genre fields:
CREATE TABLE tblAuthorTarget (
Surname varchar(100),
FirstName varchar(100),
Genre varchar(100)
)
To insert into the target table those authors whose surnames contain a Y, first write and test the SELECT statement:
SELECT
FirstName,
LastName
FROM
tblAuthor
WHERE
LastName like '%y%'
This will return the following 2 rows:

The rows returned by this SELECT statement.
To put these rows in our target table, just add an INSERT INTO statement above it:
INSERT INTO tblAuthorTarget (
FirstName,
Surname
)
SELECT
FirstName,
LastName
FROM
tblAuthor
WHERE
LastName like '%y%'
SELECT * FROM tblAuthorTarget
This query will show the 2 rows added into the target table:

Notice that the column headings are different from those in the source table.
To understand this statement, remember that SQL always works with sets of rows. So the command reads: take this set of rows and put them in another table.
Using Stored Procedures to Insert Rows into a Table
You can take the results from a stored procedure and feed them into another table. For example, suppose we create a stored procedure to list out the authors in the source table whose names contain a given letter:
CREATE PROC spListAuthors(
@Letter char(1)
)
AS
SELECT
FirstName,
LastName
FROM
tblAuthor
WHERE
LastName like '%' + @Letter + '%'
You could then call this stored procedure when inserting rows into a table:
INSERT INTO tblAuthorTarget (
FirstName,
Surname
)
EXEC spListAuthors 'H'
SELECT * FROM tblAuthorTarget
This will show the authors whose names contain an H:

The rows returned by this excerpt of SQL.
Using a stored procedure like this can make this command easier to read, since it separates the selection of data from the insertion into a new table.
Outputting the Inserted Rows
A neat trick in SQL allows you to show selected fields from the rows inserted, using the OUTPUT keyword with Inserted. The following SQL uses UNION ALL to add 3 rows into a new table of authors:
CREATE TABLE tblAuthor (
AuthorId int IDENTITY(1,1) PRIMARY KEY,
FirstName varchar(100),
LastName varchar(100) NOT NULL,
)
INSERT INTO tblAuthor(
FirstName,
LastName
)
OUTPUT
Inserted.AuthorId,
Inserted.FirstName,
Inserted.LastName
SELECT 'Vikram', 'Seth'
UNION ALL
SELECT 'Ian', 'Banks'
UNION ALL
SELECT 'Robert', 'Harris'
UNION ALL
SELECT 'George', 'Orwell'
Notice that we output the author's id, first name and surname for each author added:
OUTPUT
Inserted.AuthorId,
Inserted.FirstName,
Inserted.LastName
Here's what the above SQL would show:
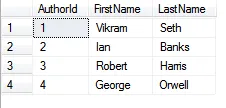
We've chosen to output the author id, first name and last name for each row added.
All of the examples on this page add rows into an existing table, but what if you want to create a new one? That's the subject for the final part of this tutorial.
After the complications of inserting rows into an existing table, this is refreshingly simple. All that you do is take a simple SELECT statment:
CREATE TABLE tblAuthor (
AuthorId int IDENTITY(1,1) PRIMARY KEY,
FirstName varchar(100),
LastName varchar(100) NOT NULL,
)
INSERT INTO tblAuthor (
FirstName, LastName
) VALUES (
'Vikram', 'Seth'
)
INSERT INTO tblAuthor (
FirstName, LastName
) VALUES (
'Ian', 'Banks'
)
INSERT INTO tblAuthor (
FirstName, LastName
) VALUES (
'Robert', 'Harris'
)
INSERT INTO tblAuthor (
FirstName, LastName
) VALUES (
'George', 'Orwell'
)
SELECT
LastName,
FirstName,
AuthorId
FROM
tblAuthor
WHERE
LastName <> 'Orwell'
This will return a list of the 3 authors added who aren't called Orwell:
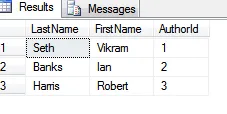
The authors returned by this SQL.
To this, you just add an INTO clause:
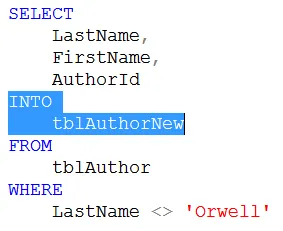
We put the authors returned into a new table.
Thus if you amend the end of our SQL to read like this:
SELECT
LastName,
FirstName,
AuthorId
INTO
tblAuthorNew
FROM
tblAuthor
WHERE
LastName <> 'Orwell'
SELECT * FROM tblAuthorNew
When you run it, you'll see the same rows returned, but this time from the brand new tblAuthorNew table:
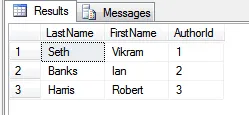
The same result, but these rows come from a new table.
What Happens if the Table Already Exists
If you run the SQL shown above a second time, you'll get an error message:

You can't overwrite a table using this method.
Because of this, it can be a good idea to check the table doesn't exist before you attempt to create it from selected rows in an existing table:
BEGIN TRY
DROP TABLE tblAuthorNew
END TRY
BEGIN CATCH
END CATCH
SELECT
LastName,
FirstName,
AuthorId
INTO
tblAuthorNew
FROM
tblAuthor
WHERE
LastName <> 'Orwell'
SELECT * FROM tblAuthorNew
And those are the ways to insert rows into a new or existing table!


