To get Excel VBA events to work in every workbook requires a number of steps:
Create a class module.
Declare an events-enabled Application variable.
Create the event procedure.
Create an instance of the class.
Connect the Application variable to the running instance of Excel.
If that sounds complicated, don't worry! There's not much code to write and this part of the blog explains exactly what to do.
Creating a Class Module
When you add an event to a worksheet or workbook module, the event will only work in that worksheet or workbook. Instead, we'll use a class module to hold the event procedures we want to run in every workbook. You can insert a class module as shown in the diagram below:
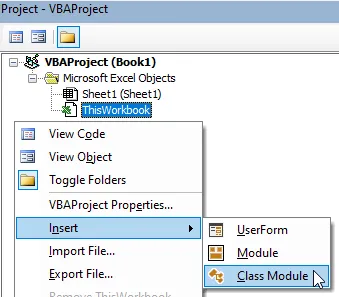
Right-click anywhere within the project and choose Insert | Class Module.
Your class module will appear in the Class Modules folder in the project.
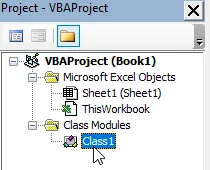
The freshly-inserted class module.
You can rename your class module in the Properties window.
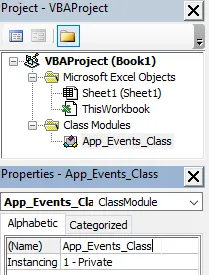
Use the (Name) property to change the class module's name.
Declaring an Events-Enabled Application Variable
At the top of the class module, we want to be able to select an Application object in the same way that we selected the Worksheet and Workbook objects in their respective modules. Sadly, we can't yet do that:

The only object we can select at the moment is the Class.
To add an Application object to the drop down list we can declare a variable using the WithEvents keyword. Add the following code at the top of the class module:
Option Explicit
Public WithEvents App_Events_Application As Application
You should now be able to select your variable from the drop down list at the top left of the code window.

The WithEvents keyword means that we can select the variable from this list.
Creating the Event Procedure
The next part of the process is the same as for worksheet and workbook events. First, select the appropriate event from the drop down list at the top right of the code window.

We've selected the SheetChange event for our App_Events_Application variable.
Now add code to the event to perform the actions you want. The code below should look fairly familiar by now:
Private Sub App_Events_Application_SheetChange(ByVal Sh As Object, ByVal Target As Range)
Target.EntireColumn.AutoFit
End Sub
Creating an Instance of the Class
Unlike with worksheet and workbook events, the event procedure in the class module will not have any effect yet. An event is triggered when something happens to an object. A class module is a blueprint for an object, but is not an object itself. To make our code work, we must create a new instance of the class. To do this, start by inserting a normal module into the project.
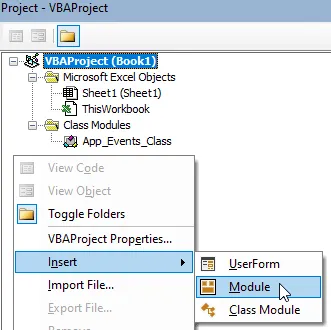
Right-click anywhere in the project and choose Insert | Module.
Your new module will sit in a separate folder to the class module you created earlier.
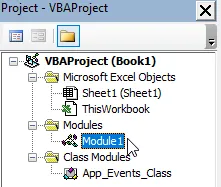
You could rename your module in the same way you renamed the class module earlier (I'm going to use the default name of Module1).
At the top of Module1, declare a variable to hold a reference to an instance of your class as shown in the code below:
Option Explicit
Dim My_App_Events As New App_Events_Class
This line doesn't actually create the new instance of our class; it simply tells VBA what to do when it encounters the variable name in later code. If the variable already refers to an object it will continue to use the reference to that object, otherwise it will create a new instance of the class.
It's important to declare the variable at the module level rather than within a subroutine. If we declare the variable within a subroutine, it will be lost when the subroutine ends. We need our variable to persist after the subroutine ends.
Connecting the Variable to the Application
The final bit of code we need to write will point the App_Events_Application variable we declared in the class module to the running instance of the Excel application. To do this, in Module1 add a subroutine using the code shown below:
Sub Activate_App_Level_Events()
Set My_App_Events.App_Events_Application = Application
End Sub
You can run the subroutine shown above to enable the event procedures in the class module at the application level. Once you've run the subroutine, the application level events will remain active until you close Excel, or until the App_Events_Application variable is set to Nothing.
You may also like to take the opportunity to create a subroutine which you can use to disable the application level events manually. To do this, add another subroutine to Module1 using the code shown below:
Sub Deactivate_App_Level_Events()
Set My_App_Events.App_Events_Application = Nothing
End Sub
Once you've run the Activate_App_Level_Events subroutine, you should find that your column widths change automatically as you enter data in any workbook.
The Limitation
The slightly clunky aspect of the above system is that to enable application level events you would have to manually open the workbook containing the above code and then run the Activate_App_Level_Events subroutine. It would be much nicer if this happened automatically whenever you open Excel and the final part of this blog shows you how to do exactly that!


