Flappy Bird in Excel VBA - Creating the Game Sheet
Useful Links
Return to the Flappy Bird in Excel VBA Tutorial index.
Download Flappy Owl Pt9 - The Game Sheet.
Introduction
In this part of the tutorial we'll create a new class to represent our game
sheet object and finally upgrade our basic test worksheet into something which
looks more like the final game sheet.
How the Game Sheet will Work
Each time we start a new game our code will create a new worksheet and
perform the following tasks:
- Resize the rows and columns.
- Hide gridlines and row and column headings
- Divide the sheet into three separate areas for the titles,
floor and game.
- Change the colour of the three areas and add borders to
separate them.
When the game ends we'll need to delete the sheet that has been created to
avoid littering the workbook with old game sheets.
Creating the Game Sheet Class
We'll create a separate class to represent the game sheet, mainly to avoid
cluttering up the module which contains the rest of the game code. Insert a
class module and rename it in the usual way.
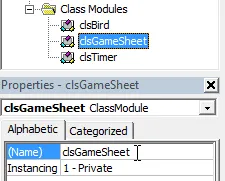
Insert and rename a class module.
We'll start by declaring some of the variables that the class will need. Add
these declarations to the top of the module:
Public GameSheet As Worksheet
Public GameRange As Range
Public TitleRange As Range
Public FloorRange As Range
Public TitleWidth As Integer
Public GameWidth As Integer
Public GameHeight As Integer
Public FloorHeight As Integer
Public BorderWidth As Integer
We've made these variables public so that code outside of the class will be
able to access them. We could have created complete property procedures to
achieve the same result but this is a quicker and easier way to do it. This type
of variable is referred to as a field of the class.
We'll use the constructor of the class to set default values for our fields.
Create the constructor by selecting the Class option from the
drop down list at the top left of the code window. Add code to the procedure so
that it looks like this:
Private Sub Class_Initialize()
TitleWidth = 120
GameWidth = 320
GameHeight = 200
FloorHeight = 20
BorderWidth = 4
End Sub
Each of these values can be changed by other code after we create a new
instance of the class but these numbers provide us with a sensible starting
point.
The Main Procedure to Create a Game Sheet
Next, we'll sketch the outline of the main method involved in this class. Add
the following subroutine:
Public Sub CreateGameSheet()
Set GameSheet = Worksheets.Add
End Sub
Now we can start filling in the details.
Resizing Rows and Columns
The first task that we'll tackle will be to set the rows and columns of
the game sheet to the correct sizes. Due to the
astonishingly convoluted way in
which columns widths are specified in Excel we'll actually do a few parts of
this process manually.
Head back into Excel and insert a new worksheet. Rename the sheet as
CellSizes.

This worksheet will be used to hold the various cell sizes that our game might use.
Next we'll create some range names to help us reference the cells in our code.
Start by selecting cell A1 and typing a range name into the name box at the top
left of the worksheet:
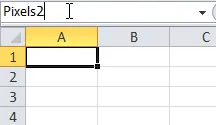
Remember that range names can't contain spaces. Don't forget to press Enter to create the range name once you've finished typing.
Using the same technique as above, create three more range names according to
this list:
|
Cell
|
Range name |
|
B2 |
Pixels4 |
|
C3 |
Pixels6 |
|
D4 |
Pixels8 |
Now that we've named the cells we need to resize them to the dimensions
indicated by the range name. We'll do this by clicking and dragging the columns
and rows to the correct size. This will be easier to do if you zoom the view
(hold CTRL and roll the mouse wheel forwards to
do this quickly).
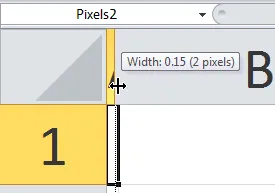
Click and drag between the column headings to change the width. Use the tooltip to help you set the column to the correct width in pixels. Unbelievably, there's no direct way to write code to do this.
Continue dragging the columns and rows until you've resized all four of our
cells. The end result should look like this:
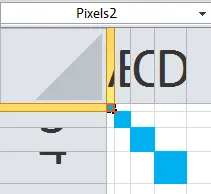
The four cells highlighted here should be perfectly square. I've only coloured them in to make them easier to see; you don't need to do this.
Now return to the Visual Basic Editor and give the worksheet a sensible codename
using the Properties window:
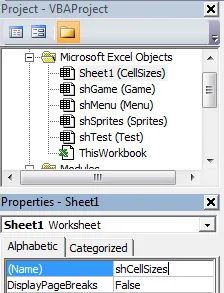
Rename the sheet in the usual way.
Now add four lines of code to the CreateGameSheet subroutine so
that it looks like this:
Public Sub CreateGameSheet()
Dim SizeCell As Range
Set SizeCell = shCellSizes.Range("Pixels2")
Set GameSheet = Worksheets.Add
GameSheet.Cells.ColumnWidth = SizeCell.ColumnWidth
GameSheet.Cells.RowHeight = SizeCell.RowHeight
End Sub
At this point it's probably worth writing a quick test procedure to make sure
that the code is behaving as expected. Head back to the modTestCode
module and add the following subroutine to it:
Sub TestCreateGameSheet()
Dim gs As clsGameSheet
Set gs = New clsGameSheet
gs.CreateGameSheet
End Sub
Run the subroutine and check that the new worksheet is created with the
correct cell size (you can delete the sheet once you're happy that it works).
You could also try changing the range name used to set the SizeCell
variable to make sure that you can create sheets with different cell sizes.
Hiding Gridlines and Headings
Turning off gridlines and row and column headings on the game sheet is
relatively straightforward. Add these two lines below the appropriate comment in
the CreateGameSheet subroutine:
ActiveWindow.DisplayGridlines = False
ActiveWindow.DisplayHeadings = False
Once you've done this you can run the TestCreateGameSheet
subroutine again to make sure that your sheet appears without gridlines or row
and column headings.
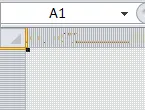
|
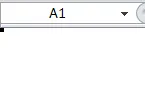
|
|
With gridlines and headings.
|
Without gridlines and headings. |
The Layout of the Game Sheet
This is the most complex part of drawing our game sheet. As the code to
implement this will be quite long we'll create a separate subroutine in the
class module to do this. We don't want this method to be usable outside of the
class so we'll declare it as private. This type of subroutine is referred to as
a helper method:
Private Sub DrawBordersAndRegions()
End Sub
The diagram below shows the basic layout that we want to create on our game
sheet:
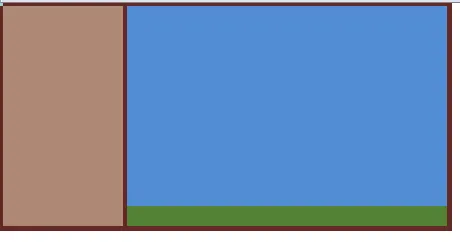
The game sheet consists of a title area on the left where we'll display things like the score, a game area where the bird and obstacles will appear and a floor area at the bottom. All of these areas are surrounded by borders.
There are several colours on the game sheet that we'll need to refer to
multiple times and which we might want to use later on in the project. It makes
sense at this point to spend a little time defining the colours that our game
will use.
Defining Game Colours
We're only going to define colours for these four items for now: the borders;
the title background; the sky background; the floor background. To make them
easier to use we're going to store the values for these colours in constants in
our code and, because the set of constants will be related we're going to group
them together using an enumeration.
Head back to the modPublicDeclarations module and add the
following code to the bottom:
Public Enum GameColour
gcBrown
gcLightBrown
gcSkyBlue
gcGrassGreen
End Enum
This declares four constants within an enumeration called GameColour.
The data type of each item in the enumeration is a long integer. By default the
first item in the enumeration is assigned a value of 0, the second is 1, and so
on. We want our constants to store the value of the colours that their names
suggest. To find out what these values are we'll manually colour in some cells
in a worksheet and use some simple code to return the number of the colour.
Head back into Excel, insert a new worksheet and change its name to
GameColours. Now change the colour of four cells to the colours that
you want to use for our four constants. Something like this:
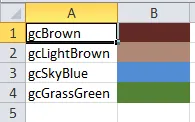
Type the name of the colour in the cell next to
the coloured one.
Now head back to the Visual Basic Editor and rename the worksheet that you've
created using the Properties window.
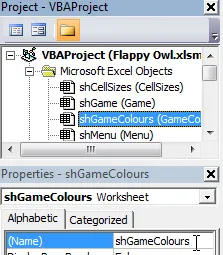
Rename the sheet in the usual way. I've called mine
shGameColours.
Now open the modTestCode module and add the following
subroutine:
Sub ListGameColours()
shGameColours.Select
Range("A1").Select
Do Until ActiveCell.Value = ""
Debug.Print _
ActiveCell.Value & " = " & _
ActiveCell.Offset(0, 1).Interior.Color
ActiveCell.Offset(1, 0).Select
Loop
End Sub
The loop that we've added checks if the active cell contains any value.
If it does then it prints the value of the colour to
the Immediate window and moves down to the next cell. It keeps
repeating these actions until the cell in column B is blank.
Run the subroutine and then open the Immediate window to see
the result. From the menu choose View | Immediate Window or
just press CTRL + G.
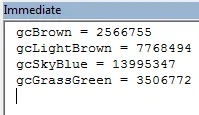
The
Immediate window will show you the actual value for each colour you've chosen. Your numbers may be different to the ones I've chosen.
Now we need to use these colours to set the values of the
constants in our enumeration. Go back to the
modPublicDeclarations module and change the enumeration
so that it looks like the code shown below. You can copy and
paste the text from the Immediate window
rather than type it in.
Public Enum GameColour
gcBrown = 2566755
gcLightBrown = 7768494
gcSkyBlue = 13995347
gcGrassGreen = 3506772
End Enum
Now we can get back to creating our game sheet.
Drawing Borders
Each region that we need to create on the game sheet will be a simple
rectangle of cells defined by a top left cell and a bottom right cell. To make
life a little easier we'll declare some variables at the top of the
DrawBordersAndRegions subroutine in the clsGameSheet
class module:
Private Sub DrawBordersAndRegions()
Dim OriginRange As Range
Dim TopLeft As Range
Dim BottomRight As Range
Set OriginRange = GameSheet.Range("A1")
End Sub
The OriginRange variable is probably a little unnecessary
here, but it will help us if we decide to change where our game regions sit on
the sheet later.
We'll begin by adding the vertical borders to the game sheet. The left-most
border will start in cell A1, its width will be equal to the BorderWidth
variable and its height will be equal to the GameHeight plus
the FloorHeight plus 2 times the BorderWidth
variables. Add the following code to the subroutine, after the line which sets
the OriginRange variable:
Set TopLeft = OriginRange
Set BottomRight = OriginRange.Offset( _
((BorderWidth * 2) + GameHeight + FloorHeight) - 1, _
BorderWidth - 1)
Range(TopLeft, BottomRight).Interior.Color = GameColour.gcBrown
The next border will separate the title region from the game region. Its
height and width will be the same as the first border but its top left cell will
be offset to the right by the width of a border and the width of the title
region. Add the following code to the subroutine:
Set TopLeft = OriginRange.Offset( _
0, _
BorderWidth + TitleWidth)
Set BottomRight = TopLeft.Offset( _
((BorderWidth * 2) + GameHeight + FloorHeight) - 1, _
BorderWidth - 1)
Range(TopLeft, BottomRight).Interior.Color = GameColour.gcBrown
The final vertical border will form the right hand edge of the game region.
Its height and width will be the same as the other vertical borders but its
starting position will be offset to the right by the width of two borders plus
the title region plus the game region. Add the following code to the bottom of
the subroutine:
Set TopLeft = OriginRange.Offset( _
0, _
(BorderWidth * 2) + TitleWidth + GameWidth)
Set BottomRight = TopLeft.Offset( _
((BorderWidth * 2) + GameHeight + FloorHeight) - 1, _
BorderWidth - 1)
Range(TopLeft, BottomRight).Interior.Color = GameColour.gcBrown
Now for the top border. Its origin will be cell A1. Its height will be the
same as the BorderWidth variable. Its width will be the same as
three border widths plus the title area width and the game area width.
Set TopLeft = OriginRange
Set BottomRight = OriginRange.Offset( _
(BorderWidth - 1), _
((BorderWidth * 3) + TitleWidth + GameWidth) - 1)
Range(TopLeft, BottomRight).Interior.Color = GameColour.gcBrown
The bottom border will have the same height and width but it will be offset
down by the width of a border plus the game area height plus the floor area
height.
Set TopLeft = OriginRange.Offset( _
(BorderWidth + GameHeight + FloorHeight), _
0)
Set BottomRight = TopLeft.Offset( _
BorderWidth - 1, _
((BorderWidth * 3) + TitleWidth + GameWidth) - 1)
Range(TopLeft, BottomRight).Interior.Color = GameColour.gcBrown
At this point it's probably worth testing that the current code works. Go
back to the CreateGameSheet subroutine and add a call to the
DrawBordersAndRegions procedure below the appropriate comment.
Now go back to the modTestCode module and run the
TestCreateGameSheet procedure.
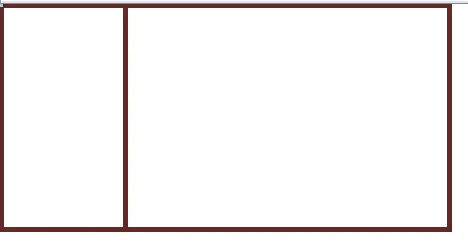
The game sheet should be neatly divided into separate areas.
Drawing Game Regions
We'll colour the game regions in a similar way to colouring the borders: by
defining the top left and bottom right of each area and changing the colour of
the cells to the appropriate colour. We'll start with the title region so add
the following code to the bottom of the DrawBordersAndRegions
subroutine:
Set TopLeft = OriginRange.Offset( _
BorderWidth, _
BorderWidth)
Set BottomRight = TopLeft.Offset( _
(GameHeight + FloorHeight) - 1, _
TitleWidth - 1)
Set TitleRange = Range(TopLeft, BottomRight)
TitleRange.Interior.Color = GameColour.gcLightBrown
The important thing here is that as well as colouring in the title region we
set a reference to the range in the public variable called TitleRange.
This will allow code outside of the class module to reference this area when the
game is running. We'll need to do this later in the project when we want to do
things such as display the score in the title area.
Next we'll deal with the game region in a similar way:
Set TopLeft = OriginRange.Offset( _
BorderWidth, _
(BorderWidth * 2) + TitleWidth)
Set BottomRight = TopLeft.Offset( _
GameHeight - 1, _
GameWidth - 1)
Set GameRange = Range(TopLeft, BottomRight)
GameRange.Interior.Color = GameColour.gcSkyBlue
Again, it's important that we set a reference to the game region so that
later code can refer to it.
The final region to define is the floor:
Set TopLeft = OriginRange.Offset( _
BorderWidth + GameHeight, _
(BorderWidth * 2) + TitleWidth)
Set BottomRight = TopLeft.Offset( _
FloorHeight - 1, _
GameWidth - 1)
Set FloorRange = Range(TopLeft, BottomRight)
FloorRange.Interior.Color = GameColour.gcGrassGreen
After doing this it's worth running the TestCreateGameSheet
subroutine again and checking the result looks something like this:
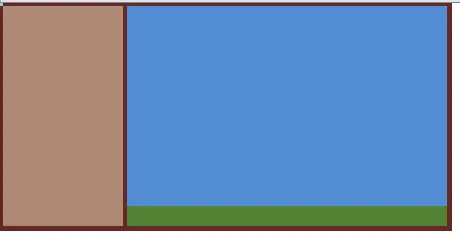
It looks basic but all of the game regions are clearly defined.
Using the Game Sheet Class
Now we need to incorporate our new class into the main game code. Return to
the modGameCode module and declare this variable at the top,
just below Option Explicit:
Private GameSheet As clsGameSheet
Now modify the InitialiseGame subroutine so that it looks
like this:
Public Sub InitialiseGame()
SetGameKeys
Set GameSheet = New clsGameSheet
GameSheet.CreateGameSheet
Set Bird = New clsBird
Set GameTimer = New clsTimer
GameTimer.StartTimer
End Sub
This will successfully create a new game sheet when the game starts but,
unfortunately, that's not where our Owl will appear. The code in the class
module which defines the bird still refers to the test worksheet. We've still
got some work to do to make everything work.
Updating the Bird Class
When we create a new instance of our bird class it needs to know which cell
on the new game sheet to start on. When its update method is called the bird
needs to know where the floor is and also in which new cell to draw itself. We
have a variety of choices as to how we could accomplish this but I think that
the simplest is to pass a reference to the entire game sheet to the new instance
of the bird just after it is created.
If we were using a language other than VBA this would be the perfect time to
write a constructor for the bird class with a parameter which would accept an
object of the game sheet class.
We'll create a simple write-only property to do this. Start by declaring a
private variable at the top of the clsBird class module:
Private pGameSheet As clsGameSheet
Now write a property procedure as follows:
Public Property Set GameSheet(Value As clsGameSheet)
Set pGameSheet = Value
Set BirdCell = _
pGameSheet.GameRange.Cells(Int(pGameSheet.GameHeight / 2), 40)
BirdImage.Copy BirdCell
Set FloorRange = pGameSheet.FloorRange.Cells(1, 1)
End Property
We've previously seen the Property Let procedure for
creating basic data-type properties. We use Property Set when
the property refers to an object. The code positions the bird halfway down the game area and 40 cells in from the
left hand edge of game area. It also sets the FloorRange variable to refer to
the first cell within the floor area of the game sheet.
Now that we can refer to the game sheet within the bird class we can update
the code to make sure that the bird gets drawn in the correct worksheet. Start
in the Class_Initialize procedure and change it so that it looks like
this:
Private Sub Class_Initialize()
Set BirdImage = shSprites.Range("OwlImage")
BirdHeight = BirdImage.Rows.Count
BirdWidth = BirdImage.Columns.Count
BirdVerticalMovement = 0
PreviousUpKeyState = GetAsyncKeyState(vbKeyUp)
PreviousDownKeyState = GetAsyncKeyState(vbKeyDown)
End Sub
Now go to the Update subroutine and find the line which
reads ElseIf Target.Row <= 1 Then. Change the ElseIf statement
so that it looks like this:
ElseIf TargetRow <= pGameSheet.GameRange.Rows(1).Row Then
TargetRow = pGameSheet.GameRange.Rows(1).Row
BirdVerticalMovement = 0
End If
Next, change the last line of the Update subroutine so that
it looks like this:
Set BirdCell = _
pGameSheet.GameSheet.Cells(TargetRow, BirdCell.Column)
End Sub
Now go to the Draw subroutine and change it so that it looks
like this:
Public Sub Draw()
BirdPreviousRectangle.Interior.Color = _
GameColour.gcSkyBlue
BirdImage.Copy BirdCell
End Sub
Finally in the bird class module, go to the top and change the values of
three of the constants so that they look like this:
Private Const Gravity As Byte = 2
Private Const FlapHeight As Integer = -16
Private Const DiveDepth As Integer = 16
Testing the Game
Now we can return to the modGameCode module and add a single
line just after the one which reads Set Bird = New clsBird so
that the entire InitialiseGame subroutine looks like this:
Public Sub InitialiseGame()
SetGameKeys
Set GameSheet = New clsGameSheet
GameSheet.CreateGameSheet
Set Bird = New clsBird
Set Bird.GameSheet = GameSheet
Set GameTimer = New clsTimer
GameTimer.StartTimer
End Sub
Notice that we need to use the Set keyword here because the
property refers to a class of object, not just a simple data type.
Head back into Excel and on the menu sheet click the Start Game
button. You should see a new game sheet is created and the bird is drawn in the
correct place. Check that you can move the bird up and down and that you can end
the game by pressing TAB.
There are, of course, several improvements that we need to make. Firstly, the
bird image is surrounded by cells with no fill colour so we need to make these
the same colour as the game background. Secondly, when our game ends the game
sheet is left behind so we want to make sure that it gets deleted.
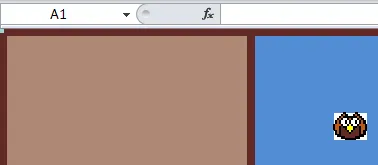
We don't really want to see the white box around the bird.
Updating the Bird Image
It's probably easy enough to colour in the cells around the bird image by
hand but we'll write a simple procedure to do it for us. Head into the
modTestCode module and add the following subroutine:
Sub ChangeBirdBackground()
Dim r As Range
For Each r In shSprites.Range("OwlImage")
If r.Interior.ColorIndex = xlNone Then
r.Interior.Color = GameColour.gcSkyBlue
End If
Next r
End Sub
Notice that we test the ColorIndex property but change the
Color property. Run the subroutine and check the
Sprites worksheet to make sure the that bird is surrounded by blue
cells.
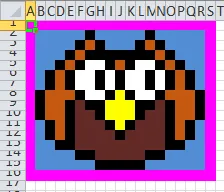
The cells that weren't previously coloured should now be blue.
Removing the Game Sheet When the Game Ends
We'll use the destructor of the game sheet class to make sure that the game
sheet gets deleted when we end the game. Go back to the clsGameSheet
class module and use the drop down lists at the top of the code window to create
the procedure.

Choose
Terminate from the drop down list on the right.
Now add code to the procedure so that it looks like this:
Private Sub Class_Terminate()
Application.DisplayAlerts = False
GameSheet.Delete
Application.DisplayAlerts = True
End Sub
Now return to the modGameCode module and add a line to the
TerminateGame subroutine so that it looks like this:
Public Sub TerminateGame()
Set GameTimer = Nothing
Set Bird = Nothing
shMenu.Activate
Set GameSheet = Nothing
ResetKeys
End Sub
Time to test the game once more: head back to Excel and click the
Start Game button. This time the image should appear without white
cells surrounding the bird and, when you end the game, the game sheet will be
deleted automatically.
Final Bits of Tidying Up
Right at the start of the project we created a worksheet called Game.
We don't need this sheet any longer so it's time to delete it. It's easiest to
do this manually in Excel.
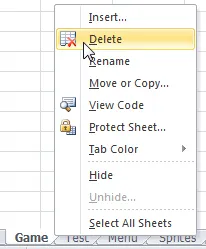
As our code automatically generates our game sheets we don't need this one any longer. Right-click on it and choose to delete it.
If you find that any of the code doesn't work you can download the working
version of the workbook from the top of this page.
What's Next
The bird can now fly up and down in the game sheet but currently doesn't have
any obstacles to avoid. The next part of the tutorial will show you how to add
these obstacles into the game.


