Read our blogs, tips and tutorials
Try our exercises or test your skills
Watch our tutorial videos or shorts
Take a self-paced course
Read our recent newsletters
License our courseware
Book expert consultancy
Buy our publications
Get help in using our site
551 attributed reviews in the last 3 years
Refreshingly small course sizes
Outstandingly good courseware
Whizzy online classrooms
Wise Owl trainers only (no freelancers)
Almost no cancellations
We have genuine integrity
We invoice after training
Review 30+ years of Wise Owl
View our top 100 clients
Search our website
We also send out useful tips in a monthly email newsletter ...
In an earlier module we saw how to use a Do Loop to continue looping over a set of instructions based on the result of a logical test. A For Next loop continues looping based on the value of a counter. When the counter reaches a specified limit, the loop with stop. This part of the lesson explains the basic syntax of the For Next loop.
You don't need to download any files for this part of the lesson.
You can click here to download a file containing the sample code.
To demonstrate the basics of the For Next loop we'll create a subroutine which loops three times and writes information to the Immediate window. Start by creating a new workbook and open the VBE. Insert a new module and create a subroutine called BasicForNextLoop:
Create a basic subroutine as shown here.
A For Next loop requires a variable to keep track of how many times the loop has been executed. Declare a counter variable called i which uses the Integer data type:
Declare a variable as shown. You can provide a different name for the variable if you prefer.
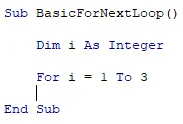
To begin a For Next loop you must say which number you want to the loop to begin counting from and which number it should count to. Add a line of code which counts from 1 to 3 as shown below:
Use the counter variable to count from a lower value to a higher one. you can start and end at any whole number, providing it is within the range of values allowed by the data type you have used.
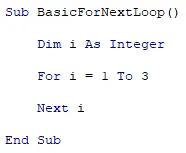
To tell the loop to move on to the next iteration use the Next keyword:
You can optionally write the name of the variable after the word Next.
Each time the code reaches the Next keyword it will increase the value of the counter variable by 1 and then check the value against the number you have told the loop to count up to. The loop will automatically stop once the value of the variable exceeds the upper limit of the loop that you specified.
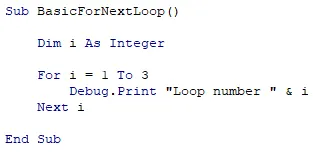
All that remains is to add some code within the loop. Add an instruction which writes the value of the counter variable to the Immediate window:
Use the Debug.Print statement to write information to the Immediate window.
Execute the subroutine and check the results in the Immediate window. If you can't see this window, choose View | Immediate Window from the menu:
The not very impressive result of running the code!
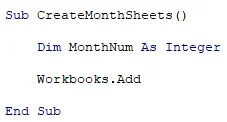
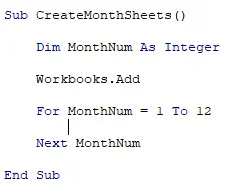
For Next loops are useful when you have a set number (or you can determine the number) of iterations to perform. We can create a procedure which created a new worksheet for each month of the year by looping twelve times. Begin a new subroutine called CreateMonthSheets and add an instruction which creates a new workbook:
Begin the subroutine as shown here.
Create a variable which you can use as a loop counter:
We've used a more descriptive name for the variable this time.
Create a For Next loop which counts from 1 to 12:
Create the loop below the line which creates the new workbook.
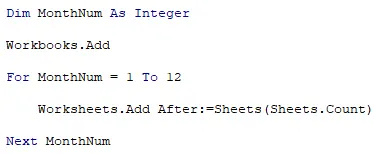
Add an instruction within the loop which creates a new worksheet and positions it after any existing sheet in the workbook:
Add the instruction to add the worksheet between the For and Next lines.
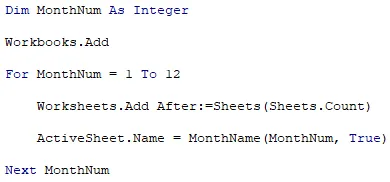
Add an instruction within the loop to change the name of the sheet that has just been added:
You can use the MonthName function to convert the numbers 1 to 12 into the corresponding month names. Set the second parameter of the function to True to create short month names or False to create full month names.
Run the subroutine and check the result in the new workbook that has been created:
The new worksheet will have a separate sheet for each month of the year.
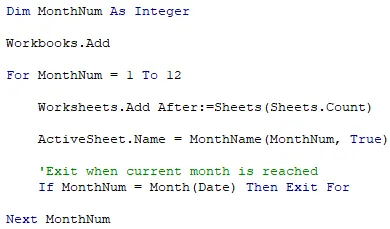
You can exit from a For Next loop before the counter reaches its limit using the Exit For statement. In the example we have just created, perhaps we want to create worksheets only up to the current month of the year. Add an If statement which checks if the value of the MonthNum variable is equal to the month number of the current system date:
If the value of the counter variable is the same as the number of the current month then exit from the For Next loop.
Run the subroutine again and check that you see a different number of worksheets (unless it is currently December!):
Running the code in August means that only eight new worksheets are created in the new workbook.
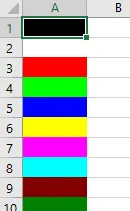
To practise writing basic For Next loops we'll create a subroutine which shows the 56 different colours available to the ColorIndex property of a cell:
Sub ColourLoop()
Dim ColourNum As Integer
End Sub
Sub ColourLoop()
Dim ColourNum As Integer
ThisWorkbook.Activate
Worksheets.Add
End Sub
Sub ColourLoop()
Dim ColourNum As Integer
ThisWorkbook.Activate
Worksheets.Add
For ColourNum = 1 To 56
Next ColourNum
End Sub
Sub ColourLoop()
Dim ColourNum As Integer
Dim ColourCell As Range
ThisWorkbook.Activate
Worksheets.Add
For ColourNum = 1 To 56
Next ColourNum
End Sub
Sub ColourLoop()
Dim ColourNum As Integer
Dim ColourCell As Range
ThisWorkbook.Activate
Worksheets.Add
For ColourNum = 1 To 56
Set ColourCell = Cells(ColourNum, 1)
Next ColourNum
End Sub
Sub ColourLoop()
Dim ColourNum As Integer
Dim ColourCell As Range
ThisWorkbook.Activate
Worksheets.Add
For ColourNum = 1 To 56
Set ColourCell = Cells(ColourNum, 1)
ColourCell.Interior.ColorIndex = ColourNum
Next ColourNum
End Sub
The first few rows of the new worksheet should resemble this.
Kingsmoor House
Railway Street
GLOSSOP
SK13 2AA
Landmark Offices
99 Bishopsgate
LONDON
EC2M 3XD
Holiday Inn
25 Aytoun Street
MANCHESTER
M1 3AE
© Wise Owl Business Solutions Ltd 2024. All Rights Reserved.