DML, or Data Manipulation Language triggers are used to execute code when the data in your database is modified, i.e. when an INSERT, UPDATE or DELETE statement is executed on a table or a view.
Why use DML Triggers?
In many respects DML triggers are similar to constraints and you can use them in a similar way to enforce business rules and data integrity. The main benefits of using a DML trigger rather than a constraint are shown in the table below:
DML Trigger Features |
|---|
DML triggers can reference columns in other tables, unlike a check constraint. |
A constraint can only use standard, system error messages to inform the user of issues, while a trigger can provide completely customised messages and even complex error-handling routines. |
You can create multiple triggers for the same event (INSERT, UPDATE or DELETE) in the same table. |
Triggers can perform more complex actions than a simple constraint. |
Types of DML Trigger
There are two types of DML trigger: AFTER and INSTEAD OF. The names of these triggers are fairly indicative of when they run! An AFTER trigger will be executed immediately after the event which triggered it has run successfully. An INSTEAD OF trigger replaces the event which originally called the trigger.
Creating a DML Trigger in the Object Explorer
You can add a DML trigger to a table or a view in the Object Explorer window. To do this, expand the table or view and then right-click the Triggers folder.
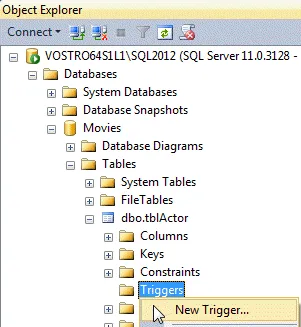
From the right-click menu, select New Trigger...
When you select the option shown above SQL Server will create a new query window full of system-generated code which you can then modify to create your trigger.

Manipulating the system-generated code can be tricky!
As with many examples of system-generated code it is often easier to write your own code from scratch.
Writing Code to Create a DML Trigger
You can write code to create a trigger in any query window, as long as the statement which creates the trigger is the first one in a batch.
The basic syntax for an AFTER trigger is shown in the example below:
CREATE TRIGGER trgMyAfterTrigger
ON tblMyTable
AFTER INSERT,UPDATE,DELETE
AS
BEGIN
END
The AFTER statement controls which data modification events your trigger will handle. You can choose to handle all three events with the same trigger, as we've done here; create a trigger which handles any two events; or write a separate trigger for each event. You can also have more than one AFTER trigger for each event.
The basic syntax for an INSTEAD OF trigger is very similar to that for an AFTER trigger:
CREATE TRIGGER trgMyInsteadOfTrigger
ON tblMyTable
INSTEAD OF INSERT,UPDATE,DELETE
AS
BEGIN
END
Again, you can write your trigger to handle all three data modification events or any single event or pair of events. The main difference is that you can only have one INSTEAD OF trigger for each event.
An Example of a Simple AFTER Trigger
The example below prints a message whenever an actor is added to, deleted from or modified in the tblActor table:
CREATE TRIGGER trgActorsChanged
ON tblActor
AFTER INSERT,UPDATE,DELETE
AS
BEGIN
PRINT 'Something happened to tblActor'
END
After executing the code to create this trigger, any modifications to the data in the table of actors will cause a message to be printed. The example below inserts a new record, modifies it and, finally, deletes it:
SET NOCOUNT ON
INSERT INTO tblActor(ActorID,ActorName)
VALUES (999,'Test actor')
UPDATE tblActor
SET ActorDOB = GETDATE()
WHERE ActorID = 999
DELETE FROM tblActor
WHERE ActorID = 999
When the code above is executed we see the following output in the Messages window:

We see the message once for each action performed on the actor table.
An Example of a Simple INSTEAD OF Trigger
When you create an INSTEAD OF trigger, the instructions you provide are executed in place of the event which causes the trigger to be fired. The code shown below creates a trigger which generates an error message whenever someone attempts to insert a new record into the table of actors:
CREATE TRIGGER trgActorsInserted
ON tblActor
INSTEAD OF INSERT
AS
BEGIN
RAISERROR('No more actors can be added',16,1)
END
Once the trigger has been created, any attempt to insert a new record into the table of actors will fail and the error message will be displayed:

The result of trying to insert a record into the table of actors.
Removing a Trigger
You can remove a trigger from a table or view in the Object Explorer window:
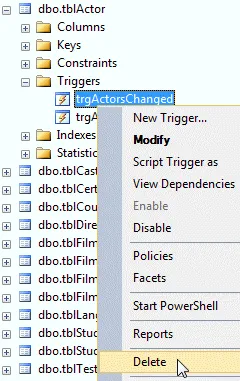
Expand the Triggers folder for the table or view and right-click on the trigger you want to remove. Click Delete to remove the trigger.
Click OK on the dialog box which appears to delete the trigger.
You can also delete a trigger in code, as shown below:
DROP TRIGGER trgActorsChanged
Disabling and Enabling a Trigger
Rather than deleting a trigger you may just want to disable it and re-enable it later. You can do this in the Object Explorer, as shown below:
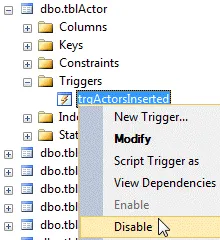 | 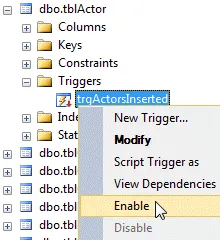 |
Right-click the trigger and choose this option to disable it. | Right-click the trigger and choose this option to enable it again. |
You can also disable and enable a trigger using code, as shown in the example below:
DISABLE TRIGGER trgActorsInserted ON tblActor
GO
ENABLE TRIGGER trgActorsInserted ON tblActor
GO
Modifying a Trigger
You can change the way a trigger works either by using the Object Explorer or by writing some code.
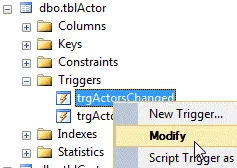
Expand the table or view and open the Triggers folder. Right-click on the trigger you want to change and choose Modify.
Choosing the option above will create some system-generated code which you can then edit to change the way your trigger works.
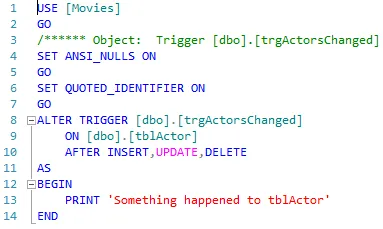
You can edit the code and then execute it to modify the trigger.
You could, of course, just have written the code out from scratch.
Specifying the First and Last DML Trigger
If you have created multiple AFTER triggers on the same table you can set which one will run first and which will run last. To do this you can use a system stored procedure called sp_settriggerorder, as shown below:
EXEC sp_settriggerorder
@triggername = 'trgActorsInserted'
,@order = 'first'
,@stmttype = 'INSERT'
EXEC sp_settriggerorder
@triggername = 'trgActorsInserted'
,@order = 'last'
,@stmttype = 'INSERT'
The stored procedure has three parameters which are explained in the table below:
Parameter | Description |
|---|
@triggername | The name of the trigger whose order you would like to set. |
@order | The order in which you'd like your trigger to run. This can be either 'first' or 'last'. |
@stmttype | The DML statement that the trigger is handling. This can be either 'INSERT', 'UPDATE' or 'DELETE'. |
If you want to remove a specific order from a trigger you can use the same stored procedure, setting the @order parameter to 'none'.
The Inserted and Deleted Tables
Often it's useful to have access to the data that has been modified when you're creating a trigger and, for this reason, SQL Server provides you with the inserted and deleted tables. These tables are generated automatically in memory whenever data is modified in a table or view and you can access their rows in your trigger code.
The table below describes how these tables are used in different DML trigger events.
Event | How the tables are used |
|---|
Insert | Any rows that are inserted into the trigger table are also added to the inserted table. |
Delete | Any rows that are deleted from the trigger table are also copied to the deleted table. |
Update | When rows are updated in the trigger table the old data is added to the deleted table and the new data is added to the inserted table. |
The simple trigger shown below will select any records that have been added into the actor table whenever an insert event occurs:
CREATE TRIGGER trgActorsInserted
ON tblActor
AFTER INSERT
AS
BEGIN
SELECT * FROM inserted
END
When the trigger has been created, any time a record is added to the table of actors its details will be shown in the Results pane.
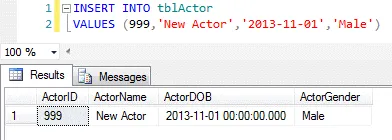
The details of the inserted row appear in the Results pane.
Using the Inserted Table for Validation
One advantage of using a trigger instead of a constraint is that a trigger can refer to columns in other tables. In this example we'll create an AFTER trigger which fires whenever a new record is inserted into the table of cast members. The trigger will check the actor table to ensure that the actor we are trying to assign to the role is still alive (it's a morbid example I admit, but hopefully it demonstrates how you could use triggers to test business logic).
CREATE TRIGGER trgNewCastMember
ON tblCast
AFTER INSERT
AS
BEGIN
IF EXISTS
(
SELECT *
FROM
tblActor AS a
JOIN inserted AS i
ON a.ActorID=i.CastActorID
WHERE
a.ActorDateOfDeath IS NOT NULL
)
BEGIN
RAISERROR('That actor is no longer alive',16,1)
ROLLBACK TRANSACTION
RETURN
END
END
Whenever a record is inserted into the cast table the trigger checks to see if there is a record in the actor table with the corresponding ActorID whose ActorDateOfDeath field is not null. If there is a record which matches these criteria an error message is raised and the transaction is rolled back. The result of attempting to insert a deceased actor into the cast table is shown in the diagram below:

The end result is that we can't assign a deceased actor to a new role.
What's Next?
Now that we have a good overview of how DML triggers work it's time to investigate DDL triggers.


